2d3d Project Notes – 1 Student Logos

Last year I was asked to come up with some suggestions for new 9-week long wheel classes for Pine Crest Boca 7th and 8th graders. The first one to come to mind was something I had been wishing for over the last few years – a course to teach students to create for and use the laser cutter, 3D printers, and other fabrication equipment we have in the iLab. In the three years since the iLab opened, much of the student’s learning of the fabrication machines and the software used for designing on them has been “just in time” – given to them when they needed it for a class or individual project. Therefore the instruction has been somewhat limited and very uneven when you look at the set of students in the lab over this time. An elective wheel class would go a long way towards fixing this.

As the curriculum and logistics for the course were figured out last spring, one 7th grade class turned into two classes with the edition of an 8th grade section (for this year only, available to this year’s 8th graders so they would get a chance to take it) and a series of projects were sketched out to focus the curriculum on. We were fortunate to bring in Ashley Becker as a new CompSci / Tech teacher with a wealth of training and professional experience in 2D design and specifically in Adobe Illustrator – something I was personally lacking. Her 2D and general design expertise along with my 3d CAD and fabrication machine experience have made us a great team, as she teaches the 7th graders and I teach the 8th graders.

From the beginning I wanted the curriculum to be based on a series of projects to be produced on the fabrication machines (run by the students), starting with 2D, and finishing in 3D. Learning to design and fabricate using vector-based software would be the common thread through the course. Students will hopefully leave with the basic skill set to allow them to make almost anything they wanted with these machines (laser, 3d printer, CNCs, vinyl cutters, plotter….) and carry these skills to the iLab in PCFL’s Upper School, and whatever makerspace they have access to in college.

So starting with this post I’ll share some notes and impressions on each project with the hopes that our ideas can help other in the MakerEd community and that the community will continue to educate and inspire us!

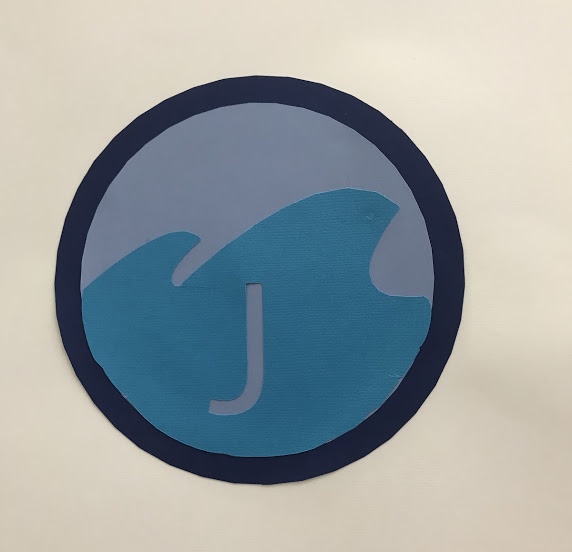
The first project was for students to create logos for themselves using the basic Adobe Illustrator tools that we had taught during the first week or so of class. These include basic shape and text objects, pen tools, the manipulation of anchor points, and the use of layers to organize and control your work. These logos could continue to be used (as students wished to) throughout the rest of the class. We avoided using bitmap grapics in the final design, and in the desire for simplicity we told students that they could import in a simple bitmap and trace it using pen tools to replicate a graphic and then modify it for their own logo. No Image Trace for this first project.

This is a relatively simple project, one I’ve seen others do online and that I’ve done myself with much younger students so it seems like a good starting point.

The logos would be fabricated using Cameo Silhouettes, using colors of paper based on the colors / layers students used in their designs. Cameos are great starter tools for fabrication. You have to think about size, layouts, layers, cutting vs sketching, and other factors that translate well to designing for more advanced fabrication tools. They are cheap, so we have a small set of them to speed up student use.

The logos and resulting builds were amazing, and the kids were obviously proud of their work. Layers were a struggle for some students, but this was a great project to show their use and importance and move students towards using layers regularly and with skill. For a simple project, much was learned and the students were ready for the next steps.

Micro:bit “Hello World”

If you have used MakeCode with the Circuit Playground Express, switching over to the Micro:bit will be a breeze! They are pretty much programmed the same way, and you transfer your code to the Micro:bit just like you do with the CPX. In this Recipe we will play with the Micro:bit, focusing on a few of the differences in its capabilities, notably its display and radio features – both of which are very useful for many project ideas your student will come up with!

Ingredients


Directions

  1. Go to makecode.microbit.org and create a new project. At the bottom of the screen, name the project “Hello Radio” and click the save icon.
  2. From the “Input” set of blocks, drag an on button A pressed event out.
  3. From the “Basic” set, drag a show string block out and place it inside the event block. Change the string to “Hello World”. Test the button on the simulator, then download and move the file to the Micro:bit board to test it there.Hello_Radio_-_makecode_microbit_org.png
  4. Now create a second event so that when the B button is pressed you get the message “Goodbye!”. Test on the simulator.
  5. Now we are going to add the radio function. You will need to work together with a partner for this one.  From the “Radio” blocks, take a radio set group block and place it in the on start event. If you are doing this with only one other person, you can leave the group as 1 but if you are doing this with a class with multiple teams then each team should use a different number.
  6. Make the changes and add new radio blocks as shown below so that the A and B buttons send messages with your name to any other Micro:bits in your group, and when you receive a message it displays it. Hello_Radio_-_makecode_microbit_org.png
  7. Download the code and test it with your friend. See if you can send messages to each other!


Hello World Garnishes

  • Icons! They are easy to select or make yourself using the show leds and show icon blocks in the “Basic” tools.
  • Can you change your radio program above to send icons to your friend? How about creating a game (like rock, paper, scissors) that you can play with two Micro:bits? A coin flipper? A reaction time game? If you need help or ideas, there are some amazing projects laid out at https://makecode.microbit.org/projects

Feeling Good about Fusion

I spent a few hours in a workshop yesterday with John Helfen and Guillermo Melantoni from Autodesk. These gentlemen are members of the team responsible for Tinkercad, and one of their topics was about helping kids (and teachers) make the transition from Tinkercad to Fusion 360. With the recent loss of Autodesk 123D Design (and 123D Make) I have been struggling to figure out the path I would lead my students at YML and Pine Crest on with CAD software. The fewer software packages kids need to learn, and I need to support, the better, and Tinkercad is quite adept at creating complex projects, but it doesn’t do everything. As their skills grow, my middle school kids need more power.

Watching John quickly create a few objects in Fusion, and showing the similarities with Tinkercad (and 123D) put me a little more at ease. I think that by grade 6 or 7, kids can make the transition to at least make the same things in Fusion that they could in Tinkercad, and that would be my first step in transitioning. Now I just need to dig in and use Fusion myself to figure out where to go from there.

Before we left, Guillermo gave us a preview into new features coming soon to Tinkercad. Wow! They have some pretty great stuff coming soon! We promised not to tell, but my students who love creating with Tinkercad are going to love it even more, and I’m already re-thinking how to improve existing projects with the new tools.

Circuit – Circuit: A “Makey-Makey-like” setup for the Adafruit Circuit Playground

Makey-Makeys are great. They allow kids (and kid-like grownups) to turn simple materials and objects into computer interfaces like game controllers, piano keyboards, and many, many other things. I’ve used them in workshops at YML, and last year I was able to supply one to each 4th grader as part of our Electronics Unit in the iLab so that they could take what they learned about simple circuits to design and build their own interfaces for Scratch projects.

For the last year or so I’ve been using another amazing Arduino-compatible board for a variety of projects – the Circuit Playground [Developers Edition].  This board is great for a number of reasons – it has 10 NeoPixels on it, a temperature sensor, accelerometer, light sensor, (very) small speaker, and alligator-clip holes to make connecting and prototyping easier. And to make it all work, a simple and well-documented library to make programming it a snap.

It also is set up so that 10 of the input pins can be used with capacitive touch, the electronic magic that allows a Makey-Makey to be wired to a banana and use it for input.  Finding this feature lead me to realize that I could have my students use the Circuit Playground instead of Makey Makeys for similar projects.

I wrote some code (now called Circuit-Circuit) which can be loaded onto a Circuit Playground and allow it to be set up pretty much the same as a Makey-Makey. There are some differences (and additional features):

  • There are 8 possible alligator-clip accessible inputs, instead of 6 on the Makey Makey. However, the M-M has 12 (I think) additional inputs that wires or headers can be attached to on the bottom of the board.
  • I created light patterns to tell you which button is being activated using the NeoPixels.
  • The two buttons built into the CP now send a string of text sending data from the temperature and light sensors. The text was designed to be used with the Scratch “Ask a Question” block, so that it can be set to activate the block, receive the data, and with a carriage return complete the input.

diagramBut the big advantage really comes down to price. A Circuit Playground is $20 from Adafruit – less with education or bulk discounts. With their ed discounts, I was able to get a board, usb cable, and set of alligator clip wires for around $20, compared to about $40 for a Makey Makey.

I hope that giving these boards out to all of this year’s Pine Crest Boca 4th graders will lead to some of them continuing to experiment with the boards beyond my Circuit Circuit Code. I send each of the students a list of online tutorials from Adafruit so they can experiment with the board themselves. I hope to have some of them come back from Summer break with some great new projects.

Kris Swanson dot Blog

My life is confusing. I spend a lot of time helping others make things, and too little time making things myself. I need somewhere to record and reflect on all of this that will stay with me for good – so here it is.  Whether I’m working in one of the Young Makers Lab / Digicamp locations I own with Mark Stansell, or helping students in the iLab at Pine Crest School, I plan on telling the story here.  Hang on, here we go…

Mintz Family iLab Project Blog

Things I've made and helped others make. Stories about creating and messing up.

Kris Swanson dot Blog

Things I've made and helped others make. Stories about creating and messing up.