Circuit Playground Express Input / Output “Snacks”

These snacks are best attempted after you have completed the Hello World and Basic Input /  Output recipes. The snacks are designed to open up the many possibilities of the sensors built into the CPE. Instead of walking you through each one, I’ll just present a description and the code for you to try. Please mess with / tweak / and expand on the given code – that’s where the fun and the learning happen!

There are some new blocks here, blocks we didn’t cover in the first recipes in this series. Don’t worry, all you need to do is find which set of blocks they belong to (by matching the colors) and set them up the way they are in the picture. Before
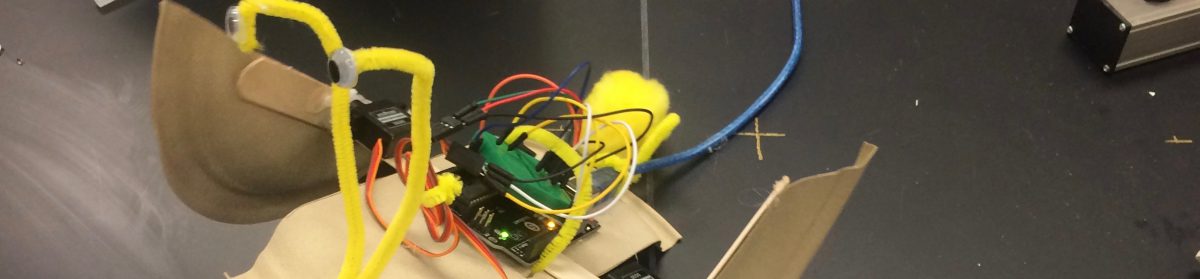
Snack 1

This code will use the built-in microphone to react when it hears a “loud sound”.

Clap_Back_-_Microsoft_MakeCode.png

https://makecode.com/_WxJEJzYD1Rge
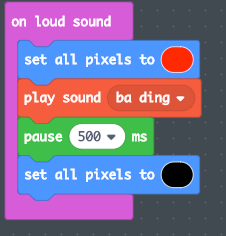
 

Snack 2

Buttons A and B will rotate and reverse the direction of light pattern on the built in neopixels.

rotate_lights_button_-_Adafruit_Circuit_Playground_Express.png

https://makecode.com/_VqrJJ8099d3z


Snack 3

We will use the built in accelerometer as a “tilt sensor” to control some of the Neopixels. We are going to use some nested if else blocks, so I’ll show you how to build it in steps.

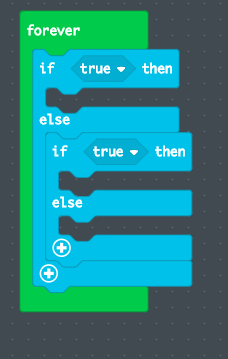
  1. Nest 2 if else blocks together inside of the forever loop. Everything else will end up inside of them.
    Screen Shot 2018-01-25 at 10.19.16 AM.png
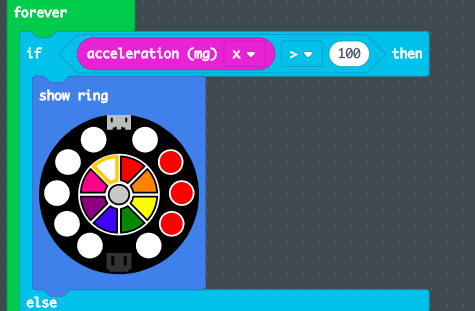
  2. From the Logic blocks add the inequality statement to the first if statement checking to see if the x accelerometer is greater than 100 (it ranges from 0 when the board is flat to 1023 when it is tilted 90 degrees to the ground.  Then add a show ring block, and light up the right lights to show it is tilting right.
    Screen Shot 2018-01-25 at 10.23.00 AM.png
  3. Finish up by setting the second if opposite of the first (inequality and number) and set the lights opposite as well. Add one more show ring and set all of the lights to neutral to show that the board is flat.
    Screen Shot 2018-01-25 at 10.23.43 AM.png
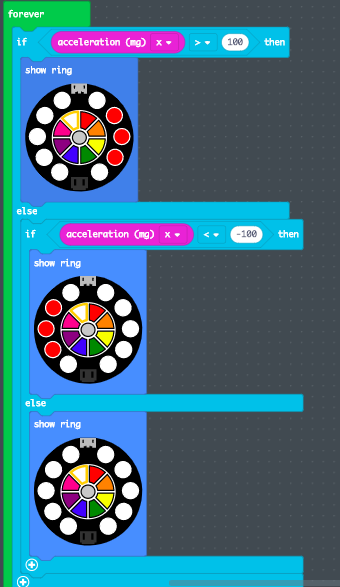
  4. Upload and you are done!


Snack Mix!

Create your own snack! Mix together the skills from all of the snacks to create your own interactive project. Add sounds, animations, and different combinations of sensors. Can you make it do something when the board drops? What about making the lights go on when it gets dark? Play and have fun!

Circuit Playground Express “Hello World”

“Hello World” refers to the first program you write on a platform or in a programming language you have never used before. This recipe is a Hello World using the Neopixel LEDs built into the Circuit Playground Express, with a few extra garnishes thrown in.

Ingredients


Directions

  1. Go to http://makecode.adafruit.com and start a new project.
  2. On the workspace, you should find a green forever block. Anything you place inside of it will repeat as long as the CPE is powered on.
  3. From the “Lights” set of blocks, select show animation and place it inside of the forever block. Select which of the six pre-set animations you want.
    Untitled_-_Adafruit_Circuit_Playground_Express.png
  4. On the left side of the screen there is a simulation of how your code will run on the real CPE. Check it out, and change the “ms” setting from 500 milliseconds to some other number to see what it does to the animation.
  5. Name the file. Look for the field in the bottom center with the floppy disk image next to it. You can call it “HelloWorld” or whatever else you like. After typing, click the floppy disk Save icon.
  6. Finally, the most technical part – sending your code into the actual CPE. The good news is that you will repeat this part each time you change or write new code so it will become rote and simple for you soon!
    1. Click the big Download button at the bottom left of the screen.
    2. Your code will download, probably into your “Downloads” folder. In Google Chrome (and other browsers) you can click the triangle next to the file you downloaded and choose “Show in Finder” to find it in your downloads folder.
    3. Plug the Micro USB cable into your CPE and into your computer.
    4. Click the reset button on the CPE. The lights should turn red then stay green, and the board will be in programming mode. Your computer will think it is a USB Drive named CPLAYBOOT.
    5. Drag the downloaded file (it will have whatever you named it in the file name) to the CPLAYBOOT disk. The file will transfer and then your program should start running on the CPE!


Garnishes

What else can you throw into the forever loop? Try some things from below, following step 6 each time to transfer your updated code to the CPE board for testing.

  • There are other options in the “Lights” blocks. You can change colors in the show ring block by clicking a new color from the center and then clicking an individual light to change its color. Alternating show ring blocks and pause blocks from the “Loops” set will let you create your own animations.
  • Check out the sounds and notes available in the “Music” set of blocks. Try adding one or more of the available sounds to your loop.


Circuit Playground Express Basic Input-Output

The real power of microcontrollers is in using them to give outputs to lights, speakers, motors, or pretty much any other electronic device based on inputs given to them from buttons, keyboards, sensors, etc…  In this recipe, we will experiment with basic inputs and outputs on the Circuit Playground Express (CPE) using only its onboard sensors, lights and speakers. Check out the Additional Input/Output Recipes for working with devices outside of the board.

Ingredients


Directions

  1. Go to http://makecode.adafruit.com and start a new project.
  2. We are going to assign each button to change the lights to a different color. Begin by dragging the on button A click block out of the “Inputs” group of blocks. Unlike the first recipe, you aren’t putting this inside of the forever loop, just out onto the workplace by itself. Whatever you put inside of it will be triggered whenever the A button on the board is pressed.
  3. From the “Lights” Group, drag out a show ring block and place it inside of the on button A click block. To make things simple, set all of the lights in the ring yellow. If you click the “A” Button on the simulator the lights on the board should all turn yellow.
    Untitled_-_Adafruit_Circuit_Playground_Express.png
  4. We want to do the same thing with button B, but have it switch the color of the lights. An easy way to do this is to duplicate the button A chunk of code and change it so the lights turn another color (blue in our example) when you press button B.
    ezgif.com-video-to-gif.gif
  5. Just for fun, repeat step 4, this time changing the drop-down menu to “Buttons A+B” and setting whichever color you like.
  6. Download your code and send it over to the CPE board. If you forget how you can review from Step 6 in the “Hello World” Recipe.


Garnishes

  • Try mixing some of the sounds in with the show ring blocks to change what happens when you press the button.
  • Play with the other “Input” blocks ( on shake, on loud sound, on light, and on switch moved) which work the same way as the on blocks you just used. Can you figure out how they work and make them do things as well?
Mintz Family iLab Project Blog

Things I've made and helped others make. Stories about creating and messing up.

Kris Swanson dot Blog

Things I've made and helped others make. Stories about creating and messing up.